Polar Vortex: Children Need Warm Leggings

IMG_0188.jpeg

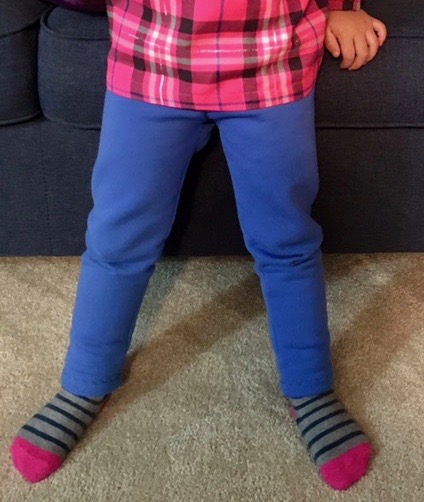
PowerStretch Leggings

Because the midwest USA is experiencing very cold weather, I am reminded of how important it is for children to have warm leggings.  While regular leggings are great, they just aren’t warm enough for bitter and cold midwestern winters.

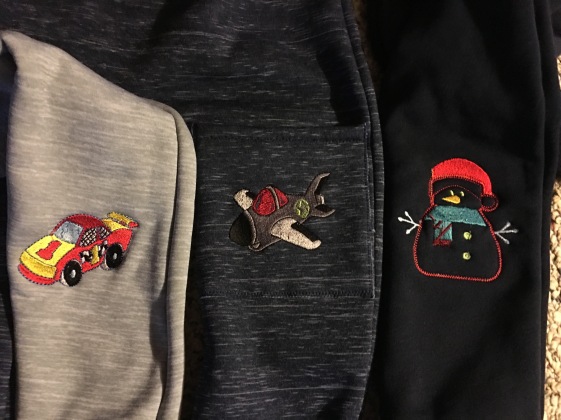
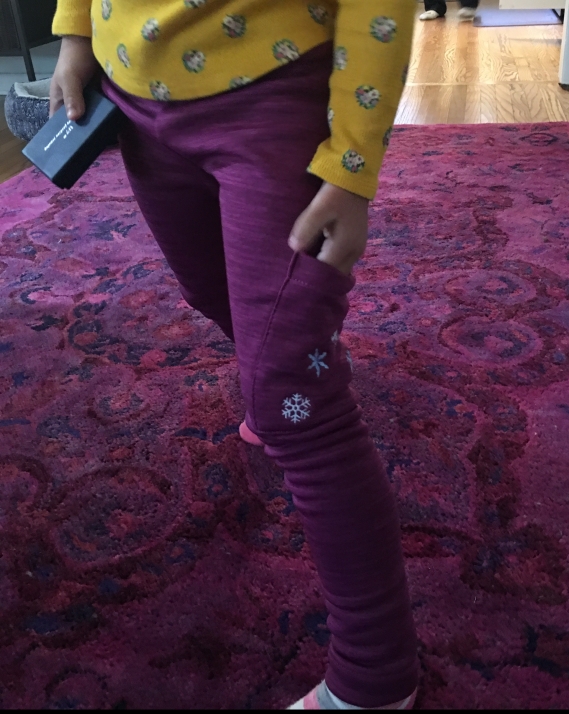
Each winter for the past 8 or 9 years, I’ve sewn winter leggings for my grand-daughters using Polartec Powerstretch. This year I sewed about 10 or 11 pair as requested by my son and daughters as they’ve come to rely on these leggings as essential winter fare.  Sixteen year old granddaughter Mira still requested new leggings this year, as last year’s were too small.  With a 3 year old grandson in the mix, I also made leggings for him.  Because I’ve acquired a new embroidery machine in the past year, I added pockets and embroidery this year.

IMG_3458.jpeg

Patterns:

The patterns for these leggings were Go To Leggings and Ottobre Funny Legs .  The $10 for the Go To Leggings pattern was a wise expenditure as I’ve used it more than 25 times in a variety of sizes.  Or your favorite leggings patterns would work as well.

IMG_3455.jpeg
Go To Leggings
IMG_3457.jpeg
Ottobre Funny Legs

Fabric:

For all of the leggings I used Polartec Powerstretch, which a smooth outside, fleece inside and has both horizontal and vertical stretch.  This makes the leggings easy to wear and the fleece inside is so cozy.  This year I purchased the fabric at Mill Yardage and The Fabric Fairy.   Powerstretch comes in light and medium weights and either will work for these leggings.  Of the two types I purchased this year, Mill Yardage had medium weight and the yardage from The Fabric Fairy was lighter in weight but also stretchier, which is always a nice feature for leggings.

Construction:

Serging has always been my preferred stitch for this type of garment and for stretch fabric however you could use a narrow zig-zag or a stretch stitch on a regular sewing machine.  For the waistband, I serged 3/4″ elastic to the top of the pants and then turned it over and top stitched with a narrow zig-zag stitch.  To finish the hems I turned the hem under and top-stitched with a simple zig-zag stitch.

img_3505-1.jpg

So if the children in your life are in need of warm leggings, consider using Polartec Powerstretch.  As for purchasing the fabric, snatch it up early in the season as the color selection sells out quickly.

Happy sewing.

Back to Blogging

This blog has been dormant for nearly 4 years, however for the past months I’ve been thinking about how I never have the opportunity to write.  It’s not that I’m a great writer, but an expectation that one should continue to develop writing and reading skills regardless of one’s developmental stage.

Speaking of “developmental stage”, I’m embarking on a birthday that will put me in the 8th decade of existence (No, I won’t be 80).  That converts to happily retired, having the privilege of traveling often and most of all, being surrounded with wonderful family.

As for sewing, I continue to sew when I can.  Since the last post on this blog we’ve added 3 grandchildren – 2 girls and 1 boy whom we adore, and for whom I sew.  That makes 2 teen GD and the “3 Littles”, as we call them.  Below are a few photos.  In most of them, the GC are wearing garments I sewed.  The top 2 are siblings, Graham and Evie.  Next is Emmie and at the bottom are Mira and Care, for whom this blog was named.


More to come as I get caught up on the past 4 years.


Never Say Never: When a Shirt is Too Small

The Problem

We’ve all been in the situation where we have a garment we absolutely love but it’s too small.  In the case of a T-shirt, there are few ways for the garment to be enlarged and yet fashionable.  That’s what most of us sewists think, anyway, but for my 11 year old creative GD, she created a way to enlarge a favorite shirt and my job was to make the alterations.  Here’s the story.

The Back-Story

Last summer, Mira and her mother were shopping at a second-hand store when Mira found a shirt she loved.  Although when she tried it on, it was barely large enough for her, much less having the required wearing ease and length.  Despite the fitting issues (and there was always an opportunity to give it to younger sister Caitlyn), they purchased the shirt for a few dollars.

Unfortunately I didn’t have the sense to take a before photo, so bear with me.

On separate occasions, Mira’s mother Angela, and Mira told me about the beloved shirt.  Angela said she didn’t think I could alter it but maybe I could make a pattern from the shirt.  Mira said “Mom doesn’t understand what I mean” and proceeded to describe the alterations she wanted.

The "after" photo.
The “after” photo.

The Alterations

The fabric was similar to a slinky fabric – a four-way stretch poly or jersey, so for the alterations I used navy jersey, to give a similar stretch to the garment.  First I removed the sleeves and opened up the sides of the shirt, the sleeve seam, copied the pattern and then made the following 4 alterations:

1, Widen the shoulders – cut (lengthwise on the fabric) pieces of navy fabric a little longer than the armscye and 1-1/2″ wide, and then sewed it to each armscye.

2.  Add to circumference to the top, cut (lengthwise on the fabric) two pieces of navy fabric the length of the top by 1-1/2″ wide, and sewed it to the front and back side seams, creating a navy stripe down the side of the shirt.

3. Add arm circumference, cut (lengthwise on the fabric) and sewed two pieces of navy fabric 1″ wide and the length of the sleeve underarm seam.  As you can see above, this alteration isn’t visible unless the arm is lifted.

4. Shirt length – cut one piece (across the grain) of navy, 2-1/2″ wide by the circumference of the shirt.  Sew onto the bottom.  I left the bottom unfinished.  

IMG_0540

Once again, here is the result, with a not quite finished shirt I made from the pattern I lifted from the design.  In the end, the shoulders were widened, the circumference was increased by 2″ and the length was increased 2″.  A real success, though it doesn’t look as great in the photos as when wearing it.

IMG_1028

What this shows me is that sometimes I need to think outside the box.  Now I know that this method could be used to alter other types of t-shirts that are a size (or two) too small.

Tutorial: American Girl Twirly Dress

Photo1
Kit’s new dress

The last post was a tutorial on how to make this dress for a big girl.  Here are a few tips on how to make this  Twirly Dress for a doll.  The steps are the same as described here with the following changes and tips.

1.  Use an 18″ doll pattern for a top or T-shirt.

2.  Instead of cutting the top back on the fold, add 3/4″ for an overlap.

3.  Finished length for the side seams on the top – 5-1/2″

4.  Skirt tiers – cut 3 strips 1-1/2″ by the width of the fabric.

5.  When assembling the top, sew both side seams but not the back seam as the back needs to be  at least partially open in order to get the dress onto the doll.

6.  Kit’s dress is a little too twirly.  Gathering ratio should be less than for a girl’s dress.  I would recommend no more than a 1.5:1 ratio.

7.  After tiers are ruffled and sewed onto the dress, sew up the back seam, stopping at the point where the skirt meets the top.

8.  Add closures, using velcro or snaps.

P1030640

Photo1
Not sure why, but here is Kit in a “time-out”

Tutorial: Girl’s Twirly Velveteen Dress

Sewing For Children

For Christmas, every girl deserves a pretty new dress. This year, Catie’s dress was a Twirl Dress – a T-shirt dress with a ruffled skirt and of course a matching dress for Kit, her American Girl doll.  Made from stretch velveteen, this twirly dress is a favorite style for girls and in fact, it’s the third in this style that I’ve sewed for Cate.  Most of all, mom’s love it because it looks dressy, is washable and the color doesn’t fade.

P1030640
Christmas dress for Cate and Kit

The steps to make this adorable dress are so simple that it’s hard to believe it all starts with a T-shirt pattern.  In this case, I used a boy’s T-shirt pattern (minus the neck binding) I’ve modified a number of times.

Tutorial:

Supplies:  1-1/2  to 2 yards of knit velveteen fabric (depends on the fabric width), matching thread, embroidered design.  Wider fabric

Steps for Dress Top:

1. Select a T-shirt pattern of the desired size, or one size larger if you wish to have growing room.  For the length, use the full length of the T-shirt.  (Cate’s is a size 6x-7 with a finished shirt side seam is 12″)

2. Cut T-shirt from the fabric, taking care to have all pieces cut in the same direction.

Tip:  In order to get the richness of the velvet color, when cutting velvet the nap should go upward.  In other words, when you brush your hand upward on the fabric, it feels smooth.  

3. Calculate how many strips you will need for the twirly skirt.     

  • Tier 1 – at least twice the circumference of the top  (52″ for Cate – fabric was 60″ wide)
  • Tier 2: One-and-a-half to twice the circumference of Tier 1 (requires sewing 2 strips together)
  • Tier 3 – One-and-a-half to twice the circumference of Tier 2 (will also require sewing several strips together)

Note:  If you are using a ruffling foot, do not cut the strips to the desired length as ruffling is not an exact process.  You can cut off any extra fabric after the tier is attached to the previous layer.

4.  For the top front, I made the final cut after the embroidery.  For the skirt, cut the number of strips you will need, cutting across the grain.  For a smaller size, these strips are 3″ , 3-1/2″ or 4″ wide.  For Cate’s dress I cut 4-1/2″ strips, which allows for 4″ tiers minus 1/4″ for each seam allowance. 

P1030589
Cut pieces. Top front was embroidered before the final cutting.

5.  Embroider or place your desired design on the shirt front.

P1030626
Close up of embroidery and neckline finish

6.  Assemble the T-shirt but do not sew the bottom 5 or 6″ of one side seam.  Finish the sleeve and neckline but do not hem the shirt.  (For the neckline I turned over 1/2″ and sewed with a coverstitch however  using a double needle method on a standard sewing machine would work as well).

Now Assemble/add the Skirt:

There are several ways to make the ruffles.

  1. Gather the top of the cut strip and attach to the dress top (i.e. t-shirt) at a 1.5:1 or 2:1 gathering ratio.  For subsequent ruffles, add the gathered portion to the bottom of the previous ruffle.  Test to see how you want it to look.
  2. Use a ruffling foot on your sewing machine or serger, set to a 1.5:1 or 2:1 ratio.  For this method, it is important to do a test or two to get the result you want.  My preferred method is to use the serger ruffling foot.
P1030611
Method 2: Sewing the first tier onto the dress top.  Clear strip is water-soluble stabilizer. Bottom layer is being gathered.

Steps if using a Ruffling Foot:

1.  Place the piece to be ruffled on the bottom, with right sides together.

Note:  Because this fabric is stretchy, holding a narrow strip of water-soluble stabilizer over the top fabric (piece that’s not being gathered) will reduce the amount of undesired stretch.

2.  When you get to the end, you will likely have some left over ruffle.  Cut off.

3.  Sew the next two tiers in the same manner.

4. Sew the open side seam.

5.  Hem by turning under 1/4″.  Sew on a standard sewing machine.

6.  Steam dress from the back side, using a generous amount of steam over the ruffled seams.  If the top layer stretched, the steaming will help the latex in the fabric to shrink back into shape.

After steaming the ruffles.
From the back
From the back
P1030658
Cate, Mira and dolls

Sewing the Popular Top with Draped Sides

Unless you’ve been living under a rock, you know that draping is all the rage in ready-to-wear.  Specifically, draping at the side of a longish top or tank, or in the center front of a sweater.  If you’re interested in sewing a garment with side draping, which is sometimes called the “sharkbite” look, it is incredibly easy to modify an existing pattern.  Although I’ve sewed a few of these, this is the only modeled garment I’ve photographed, and you’ve already seen the photo several times.

On the other hand, having planned to do this post for a while, I have taken photos of how to alter an existing pattern to make it drape on the side.  It’s the extra width at the bottom of the garment that provides the draped look.  A few examples:

While this produced the desired length, there was less draping than I hoped for.


Experiment #1 (above):  

This was my first try, where using a t-shirt pattern, I added length and tapered the side starting at the armhole.  The result was a cute top that Mira could wear over leggings but it didn’t have as much draping as I wished for.

(BTW, the black weights that look like hockey pucks are just that.  They were my DS Shaun’s when he was a teen.  When he outgrew his hockey interest I snatched the pucks and have used them ever since).

Experiment #2 (above)

Having learned that the amount of drape comes from the amount of fabric added horizontally at the hemline, this one turned out better.  In this case I used a sleeveless dress pattern which already was tapered at the side.  From the photo you can see that (for a girl’s size 10) the bottom of the fabric was cut about 7 inches from the original dress side seam.  This turned out to be the perfect amount of drape, so I used the same proportions for Catie’s red tank top.  For an adult, I would taper the bottom to at least 10-12″ from the original side seam, and would error on the side of having too much drape as you can always reduce the drape by reducing the taper at the hemline.

Construction:

Sewing the top is the same as any other and the bottom can be finished in with a hem or rolled hem of your choice.

If you’re interested in this modern look, give the above modification a try.  It’s quite easy.


Celebrating Independence Day in Style

Several weeks ago Catie announced that to match her new July 4th headband, she needed an outfit for the holiday.  We looked through my stash and found just the right fabric;  red jersey knit for the top and navy and white striped knit for the skirt.  Our planning evolved into Catie’s description of what the outfit should look like and how it should function.  Here’s the list of requirements:

  • Swirl skirt
  • Wide waistband on the hips
  • Tank top
  • Under-shorts
  • Big enough so it will fit next year (at 6 years, very practical!)
  • Stars on the top

As the last step of the planning stage, we searched my sewing room for just the right decoration – a iron-on rhinestone star.  I also went to the local chain store and purchased 4 stars.

Skirt with under-shorts

Doesn’t she look grand?  Ready for the July 4th Bike Parade in her neighborhood.

Next I’ll discuss how to make the very popular and practical under-shorts – no pattern required.

Catie’s First PJ’s: No Pattern Required

Here is very proud Caitlin wearing her second sewing project, a pair of PJ’s (the first was a pillowcase – several months ago).  At age 6, she’s pretty amazing with the sewing machine – motivated and already sewing with a plan.  It was her request to “make pajamas that are shorts and with a spaghetti strap top”.  She chose the fabric from my stash.  I cut and Cate could hardly wait to start. She eagerly sewed the seams and finished them with a zig-zag stitch using my vintage Bernina 707 with the speed on “slow”. Cate did all of the sewing except for the ruffles.  Total sewing time was about 2-1/2 hours, with a few interruptions.   Last of all she found some pre-made ribbon roses to embellish her new sleeping attire.  

After wearing the pj’s for the remainder of the day and through the night, Cate reported that they were “perfect”.   

If you’d like to work with your favorite girl to make these pj’s you don’t need to run out to the store for a pattern.  

Pajama Pants (PJ’s) Tutorial:

  1. Measure the child’s hips (22″ for Cate)
  2. Find an existing pair of shorts, pants or leggings.
  3. Turn the pants inside-out and lay the pants on top of the fabric with the center front facing you.
  4. Cut along the edges of the crotch front. 
  5. Cut along the side, adding width to the side to assure that there will be at least 6″ of wearing ease plus 1/2″ seam allowances.  For Cate, 28″ was the total circumference of the pants with the finished width of the front of 13-1/2″ and the back width of 14-1/2″. There’s no need to fuss about the size as loose PJ bottoms are needed for comfort.  
  6. The length is your choice but the inseam should be at least 2″ plus the amount you need for a hem.
  7. Turn the pants so the center back is now facing you.
  8. Repeat steps 4 and 5.
  9. Sew the seams as you would any other pair of pants.  Note:  for the ruffles, I added them after the side seams but before the inseams were sewn.
  10. Add elastic for the waist.
Oh so, easy!

PJ Top or Pillowcase dress

Here is the pillowcase dress pattern I used.  If this one doesn’t work for you, there are many other free pillowcase dress patterns on the web and YouTube has lots of video tutorials as well.  Cate, Mira and I watched one of the videos.  Mira noted that the woman put her fingers “too close” to the sewing machine needle.  I learn so much when teaching Cate and Mira to sew.

As you can imagine, these pj’s have been a hit – suitable for bedtime or playtime.   Give it a try with your favorite child and let me know what you learn.

What to do with Left-Over Fabric

Sewing blogs and sites abound with questions about how to use left-over fabric.  For the past few years I have packed it into large zip-lock bags, labeled it and donated the bags to the local second-hand shop.

Before we moved I saved some bits and pieces for my granddaughters.  Several days ago while at our house they discovered their “stash” and had a limitless amount of fun with what they found.   All they needed were safety pins (like every pin I could find), scissors and their creative energy.  Here is the result:

Lesson to self:  Never underestimate the creativity of a child.

Mira’s Sewing Lessons: Pajama Top

About a year ago, I blogged about teaching Mira to sew her first pair of pajama pants.   Unfortunately because we live hours from each other and because visits are filled with other fun activities, we have little time for sewing.  However on our last visit we had a “sewing date”.  Her choice was to make a pajama top to match the beloved but now “high-water’ pants she made last year.  She designed the top, using a complimentary flannel print for the sleeves.

So proud in her new pj top

Hmmm. So how could I help Mira sew a pj top with no buttons and yet so she could pull it over her head?  With not many patterns to chose from, I bought a raglan knit pj top.  By cutting it several sizes larger than her size, cutting out the neckline to fit over her head and by placing a small amount of elastic at the neckline we were set to sew.  As far as the fabric type, pre-washed flannel is great for a project such as this because the fabric is easy to sew and it doesn’t ravel easily so there’s no overcasting.

**********************************

Me:  “What’s the first safety rule for sewing?”

Mira:  “Never put your fingers near the needle.”

She passed the test and we were ready to sew.

Little did I know that Mira was envisioning a hood on the pj top.  So when the sleeve and side seams were done, Mira said, “Now, let’s add a hood”.  (Guess I’ve made sewing look way too easy).  Her bathrobe has a hood, so I traced the pattern and we had a hooded pj top.

What a proud girl she was, every step of the way.  Sewing (and trying on) time took about one hour.

Meanwhile…..

Catie did art projects with her grandpa while eagerly awaiting her turn at the sewing machine.  At age 6, she’s not quite ready to sew independently, so we came up with a plan to sew quilt pieces.  It worked beautifully.

Cate sat on my lap and when needed at the beginning and end of stitching a square, she toggled to reverse the stitch.  It was perfect for her – she was involved and still safe.  Meanwhile, her foot stayed right on top of mine.

 What a fun time we had.  To be continued….